
Why do rugs have to cost so much? Even little runner rugs, um hello... Fifty dollars?
No thanks. It's not like we don't have the money but I don't want to shell out that kind of cash for a floor decoration. And, we don't have the money ;)
So after making Sawyers teepee we had quite a bit of drop cloth left.
I instantly thought, "rug!" And after searching the World Wide Web, I realized I wasn't the only one!
It was great having a tutorial, no matter how easy the project may be.
Let me just tell you this right now.... I was not disappointed with the finished project!
And I actually took pictures along the way! (Because there was a lot of disappointment when I didn't while making the teepee.)
So, Here we go! A quick and easy DIY drop cloth rug.
First I measured out the area and cut my drop cloth, it was a really rough measurement and even rougher cut lol then I ironed.

Next I serged the edges. I was originally going to serge and iron down the edges and sew a top stitch but with a little one super interested in my sewing machine and Blake out playing basketball I just serged it. (And I am so glad I did!)

Next I taped my fabric. First I was going to do 5 inch painted stripes with 4 inches in between but I wanted there to be a bigger difference so I did a 3 inch gap between the paint stripes. (Again, so glad.) It also wasn't as hard as I thought it would be with Sawyer. He just 'swept' the kitchen/rug almost the whole time I taped. That's why he photobombed half of the pictures.


Like I said it was a super rough cut so the end was pretty lopsided. No worries! After I painted I cut off the reminding fabric parallel to the last painted stripe.

Next, I flipped a black garbage bag inside out and taped it to the counter top (for bleed through purpose). I flipped inside out so when I was done I could flip it the right way and still use it without getting paint everywhere. Once my workspace was ready, I got some tea, a granola bar, some music, and started painting!

P.s. The rubber band around the paint can trick realllllyyy works! For the color I went with a more universal one, gray, or Behrs Antique Tin. That way I can place the rug anywhere and it still works. I purchased two of the 7 oz sample jars for $3 and two of HDs cheapo paintbrushes. I ended up only using one jar and one brush, so now I can make another one!
Keep painting until it's done and let it dry.

After ten minutes I took it off the counter and laid it on the floor to dry with minimum wrinkles.
Because I did mine so close to bedtime my impatient soul didn't have to pace and wait for it to dry, I just went to bed :)

The next morning I ran down stairs and marveled at my work! It was beautiful but, not perfect.
I quickly cut of the uneven part and the top, went back to my serger and re-serged the WHOLE thing, took less than 5 minutes. I did that only because I love the way the white thread looks on the gray painted area. Because serging over the already serged, it ruffled the edges making it more beachy feeling, which I adore.


Because, I do have a little one that likes to romp around in the kitchen I went out to big lots and purchased a liner. It is originally shelf lining but it works great under the rug and for $2 you just can't pass stuff like that up!

I cant decided if I want to go in and sand a few painted to spots to give it a more wear and tear look or leave it crisp. But for now I'm going to throw it in the wash to soften up the fabric where the paint is, re-iron and enjoy!
The whole project from start to finish (minus drying time) only took me a few hours. All conjured up while Blake was out playing his weekly basketball game with my family. It was seriously level::easy! I'm totally in love with the finished project and for $6 for cost of paint, brush and liner and left over fabric, I'll take it! Seriously loves, if you need a simple rug, this DIY is perfect, and even more perfect with little kiddos, I mean... WASHABLE!! If you do make one and have questions, feel free to ask. You won't regret it ;)
Xoxo: Mrs. T
Another quick DIY? Pots and pans taking up to much space in your cupboards and you have left over space on top of your pantry?
Hang them!

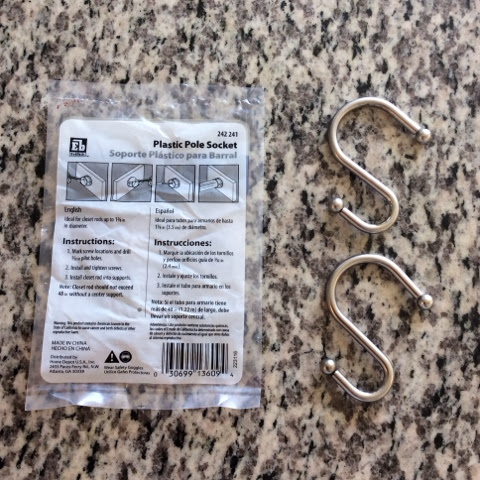
All you need is a current rod some S shaped shower hooks and for weight issues a set of plastic pole sockets. That little package is only $1.50 at HD. It's worth getting, my first time around I didn't have them and in the middle of the night the whole rod, pots and all, collapsed. Making a huge boom and I almost wet the bed thinking we were being robbed haha. Just get them.
I stole my hooks from our shower curtain, it's looked like this for a month now, don't worry though, I just bought new hooks for my shower

The lids you ask? Easy, a drying rack from the dollar store.

Happy weekend loves!